Click on "Communication" on the navigation bar and select Discussions.

The main discussion area displays a list of current, active discussions.
From the main discussion area, you will see Discussion Forums and Discussion Topics. The forums help to organize the discussion topics. For example, you may have 3 discussion topics inside the Module 2 Discussion Forum.
Click on the name of a discussion topic to participate in that discussion. The discussion topics area is where you post and respond to your classmate's posts.
Add a New Post
- Go into the Topic (blue link) and click to add a new message.

- Give the message a Subject title and type the text in the larger box. (To include an attachment, click Add Attachments.)
- Click to submit your post.


- Click Add Attachments within your post, as described in the previous section.
- Click Upload to locate the file on your computer OR you can simply drag and drop the file in the box shown.
- Click when finished.

Download an Attachment
-
Open the post.
-
Click the attachment.
Some files may open up in their specified program, such as Microsoft Word. Other files may download to your computer in the folder you specified. This will depend on your personal computer settings.
Images may open up in a new window. To save the image, right-click (or Command-Click for a Mac), choose Save Image As from the menu, and browse to the location to which you want to save the file.
Edit a Post
You can edit your post (unless editing has been restricted by the instructor). Editing allows you to fix a misspelled word or clarify your post. To edit your post, click on the drop-down arrow next to the title of your post.
A pop-up window with your post will open up. Make changes to the post then click Update: 

Reply to a Post
To reply to an existing post, select the existing posting from the list of messages in the Topic and click 
Type your message in the text box that opens up, allowing you to reply to the posting much like you would to an email.
This 2-minute video demonstrates Discussions in eLearn:
Discussions Views
There are two different ways to view discussions. The default view is the Reading View. Some users prefer to change to the Grid View. You can select the view that works best for you.
Grid View
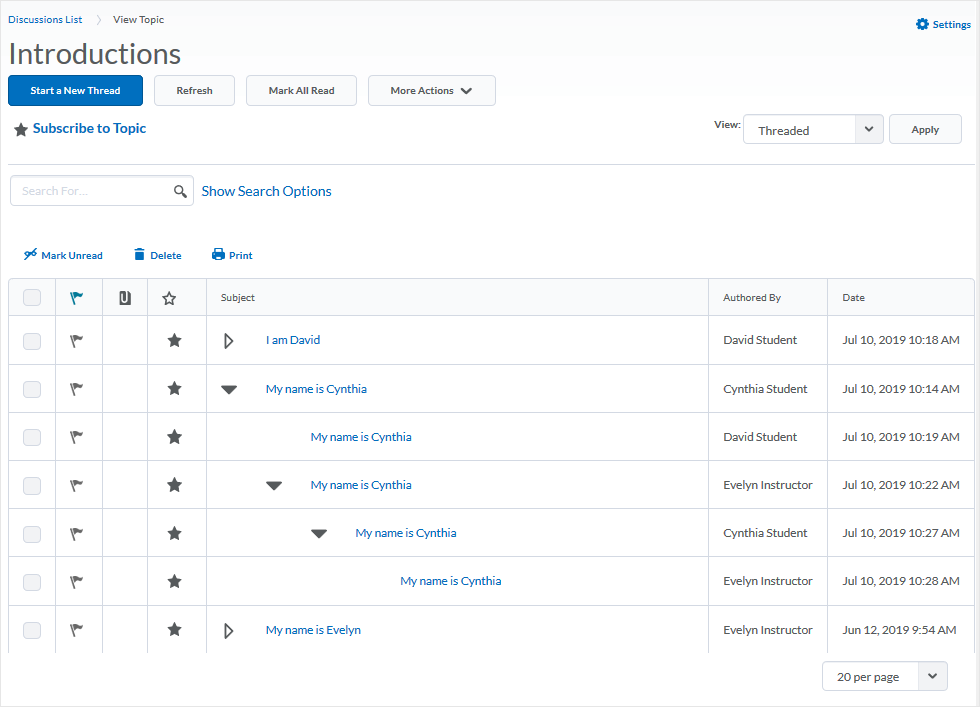
Grid view can help users easily identify learner and instructor participation, unread content, new content, and themes within Discussion topics.

Grid View of a Discussions Topic
Discussions – Setting grid view as default
Users can set their preference to use grid view as default instead of reading view when viewing topics in the Discussions tool if they have the appropriate permissions. The ability to select grid view as their default view for topics is located in Account Settings as well as in the Discussions Settings area.
When in a course, user navigates to the "Discussions" area.
To set default view when in the Discussions area, select "Settings" in the upper right.

Selecting "Settings" when in the Discussions area
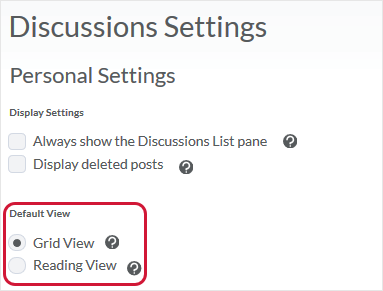
The "Default View" area is where Grid View can be set as the default.

Setting Discussions view preference in Discussions Settings
back to top
Switching between views
Users can access discussion topics using either view, regardless of their default settings, without needing to edit their Discussions settings. Both views of Discussions offer different strengths and this switching functionality allows users a method to switch views depending on what activity they want to do.
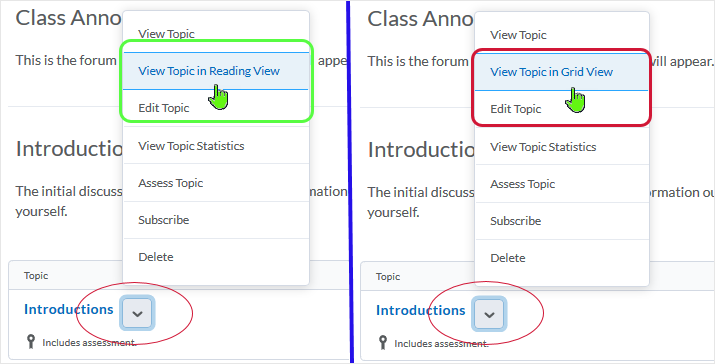
For example, if a user selects grid view as their default view, but wants to view a topic using reading view, they can select View Topic in Reading View from the context menu of the topic. Selecting View Topic or clicking on the topic name will allow the user to view the topic using grid view.
Similarly, if a user selects reading view as their default view, but wants to assess a topic using grid view, they can select View Topic in Grid View from the context menu of the topic they want to assess. They can also select View Topic or click on the topic name to assess the topic using Reading View.

Ability to view topics in reading view while grid view is set as default (left image)
Ability to view topics in grid view while reading view is set as default (right image)